WHAT ARE SHALLOT SETS?
Shallot sets are immature shallots. The seed companies grow them very close together, harvest them early and then store them in controlled conditions so that they can be sold later in the year, or the next year as shallot sets.
Many shallot sets are “heat-treated” nowadays to stop them bolting into flower. The heat treatment involves storing the shallots in very warm and sterile conditions for about four months. This effectively kills a specific part of the shallot preventing them from bolting.
The key advantage which a shallot set has over an shallot seed comes from the fact that when you plant a shallot set it is at a far more advanced stage of growth compared to a seed. They therefore spring into active growth much more reliably and quicker.
The downside of sets is that they are more expensive compared to seed. Typically, 20 shallots will cost double the price of 200 shallot seeds. In addition the number of varieties of shallot sets is very small compared to the huge number of varieties which are available as seed.
QUICK CALENDAR FOR GROWING SHALLOTS
- Plant in pots (protected position)
- Plant sets directly outside
- Protect from birds for 5 weeks
- Water in dry conditions
- Harvest some for immediate use
- Stop watering
- Harvest all and dry out
- Second week of January
- First week of April
- First week of April onwards
- Last week of May
- First week of July
- First week of July
- Third week of July
WHEN TO PLANT SHALLOTS
Shallots are normally available for sale from mid February onwards. There is no real benefit to staggering the planting of shallots because, correctly harvested and dried shallots, will store for almost a year.
The best plan is to plant all your shallot sets together at one time which is the second week of April 2017 (average for UK).
If you want a slightly earlier crop of shallots, plant them in pots (see calendar above) in a protected position.
HOW TO PLANT SHALLOTS
Shallots are not particularly picky about soil conditions but they will prefer a well dug soil, preferably dug in the previous autumn, which drains well and is neither acidic nor alkaline. Having said that they grow well in most soil conditions.
They also prefer a position in full sun or at least partial sun. Shallots can very quickly become prone to disease if good crop rotation is not practiced so never grow them in ground where any member of the onion family (onions, spring onions, garlic, leeks) have been grown in last two to three years.
Planting shallots is simplicity itself. First mark out the row with a bamboo cane or string to keep the row in a straight line. Then every 25cm / 10in make a small hole in the soil with your finger and place one shallot set into it. Plant rows about 40cm / 16in apart.
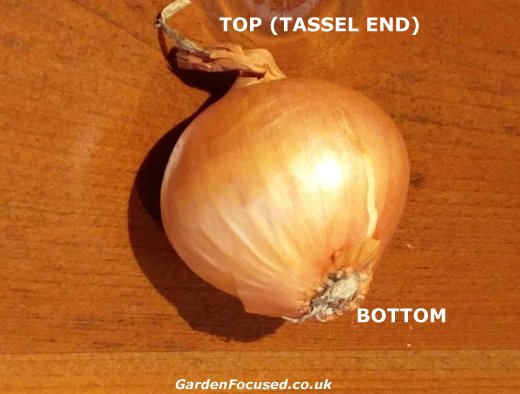
It’s important to plant them the correct way up with the root end onto the soil and tassel end uppermost. The picture below can be enlarged by clicking on it if you have any doubts. By making a little hole for each shallot set rather than just forcing them into the ground you will avoid damaging the roots.
Now gather some soil around the planted shallot set so that just the top tassel appears above the soil surface. Gently firm the soil down. Scatter some long-lasting fertiliser (bonemeal or blood fish and bone) around the surrounding soil and work it into the soil surface wit a trowel.

For the first few weeks birds may well be a problem for shallot sets. To avoid this spread some horticultural fleece over the soil surface and secure it down with soil or stones. The fleece can be removed after a month.
HOW TO CARE FOR SHALLOTS
Shallots are one of the easiest vegetables to grow and require very little attention. Their foliage is minimal so weeding will be required throughout the growing season. In dry weather they will need to be watered – lots of water occasionally rather than small amounts often is the best way to water shallots and most other vegetables.
If you have average soil then an initial feed at planting with blood, fish and bone fertiliser (see above) is all that your shallots will need. Do not feed with any nitrogen rich fertiliser (especially from July onwards) which would encourage thick necks and the risk of Neck Rot.
Around First week of July stop watering your shallots even if conditions become hot and dry. The reason behind this is to encourage them to ripen which will enable them to be stored for longer in the autumn and winter. If you have the time, gently tease away loose soil from the top of the shallots with your fingers to allow the top and neck to receive as much sunshine as possible.
WHEN AND HOW TO HARVEST SHALLOTS
Note that the dates for harvesting given in the calendar above are approximate ones only. Growing conditions throughout the spring and summer will greatly affect when your shallots are ready for harvest.
You need to look for yellowing foliage and stems which are beginning to fall over as the key indicators for ripe shallots. It's also important to choose a period of dry and preferably sunny weather for two or three days so that the harvested shallots can dry out in the sun which will greatly increase their storage life.
Our own personal routine for harvesting shallots is based on extending the
harvest time for as long as possible. Around the
first week of July we begin to harvest shallots individually for use in the next day or so. We choose the best developed ones, dig them up with a trowel and use immediately.July to early August we wait until a couple of sunny days are predicted and then dig up all the remaining shallots. Do not bend the foliage over in attempt to make the shallots dry quicker, this will only expose them to the risk of Neck Rot.Separate them into into individual bulbs and leave them on top of the soil to dry out for a couple of days. If the weather turns damp move the shallots to a shed with lots of ventilation. Then we remove the loose soil and cut off some of the top foliage but not all. The shallots are stored in a cool, dry place and used as and when needed.
SHALLOT PESTS AND DISEASES
Shallots are generally healthy vegetables but do sometimes suffer from pests and diseases and these can be difficult to eradicate. Click here to visit our pages devoted to shallot and onion problems. Lots of clear pictures and expert advice.
Care calendar
How and when to plant shallots
Caring for shallots
Harvesting shallots
Pest and Disease
HOW TO GROW SHALLOTS
Shallots are different from onions in several respects. First, their flavour is not quite so overpowering which is often preferable. They are also more suited to pickling.The obvious physical difference is that one shallot will grow into four or five shallots connected at the base. In general, they also store better compared to onions with the distinct possibility of having a year round supply from only one planting.