QUICK CALENDAR FOR GROWING CURLY KALE
Sow Curly Kale seeds– the first week of May (UK average)
Transplant Curly Kale - the second week of June (UK average)
Sow Rape Kale in situ- the first week of July (UK average)
Begin to harvest Curly Kale - the last week of October
WHERE TO GROW KALE
Kale is one of the most tolerant vegetables and it will produce a decent crop in almost all conditions except heavy shade or water-logged ground. The very best conditions for growing kale are;
- Full sun
- Moderately heavy soil such as clay which also drains well
- Neutral to slightly alkaline soil (pH
level of 6.5)
- Kale should definitely be part of a crop rotation plan. Click here to learn more about crop rotation.
WHEN AND HOW TO SOW KALE SEED
Because Kale continues to crop right through the winter it is often exposed to strong winds. For this reason it is best grown in relatively firm ground. With that in mind, add as much organic matter (compost heap etc.) as you can to to the planting area in November /December and dig it in well. Do no more digging on the ground after that, let it settle in time for planting / sowing seed.
For Curly Kale there are three methods to start it off - sowing seed where it is to grow, sowing in a seed bed or sowing in pots / modules. The last two methods will require you to transplant the young plants later in the season, but in the meantime, the ground can be used for other purposes such as new potatoes.
The timing for sowing Curly Kale seed is not critical, we would recommend some time around the first week of May (UK average). Curly Kale can be sown earlier in the seasonand it will also produce an earlier crop. However, the taste of Curly Kale improves in cold weather which is why most people prefer not to sow it earlier. Earlier sowings will also prevent the ground being used for an early alternate crop.
To sow Curly Kale in pots / modules, fill with compost nearly to the top. Make a 1cm hole in the compost surface and place two seeds in it. Cover lightly with compost. Water them in. The pots / modules can be placed on a window sill.
Germination normally takes about 10 days, with the ideal temperature being around 15°C. However kale will germinate within a very large range of temperatures, from 5°C to 30°C. Thin to one plant per module / pot
If sowing in a seed bed or where they are to grow permanently, make grooves in the soil about 1cm deep and sow the seeds thinly. Lightly cover with fine soil and water in well.
For seed beds, thin the plants to 10cm / 4in apart when they appear. For the ones growing in their permanent positions, thin to 50cm / 20ins apart.
TRANSPLANTING CURLY KALE
Curly Kale sown in seed beds or modules / pots will need to be transplanted to their permanent growing area. The best time to do this when the plants are 10cm / 4in to 15cm / 6in tall which should be around six weeks after the seeds were sown. The same applies to plants sown in a seed bed.
If the plants were raised indoors they will need to be hardened off for a week or so before transplanting.
Before transplanting, scatter a couple of handfuls, per square metre, of fish, blood and bone onto the planting area. When transplanting try to avoid disturbing the roots as much as possible. The plants should be planted 2cm / 1in deeper than the were previously. Spacing between plants and rows should be 50cm / 20in. Water well if the ground is at all dry.
CARING FOR CURLY KALE
Curly Kale requires very little attention after it is planted in its final position. The following care plan will ensure you get the best from them:
- Remove any yellowing leaves.
- Water well when conditions are dry.
- Weeding will be required initially but the plants will quickly grow large enough to smother all but the most determined weeds.
- When it comes time for harvest (see section below), harvest even if you plan not to eat all the leaves. Harvesting regularly will encourage new shoots and large leaves left on the plant will only become bitter and inedible.
- A nitrogen rich feed, such as Growmore, in mid February will encourage more side shoots.
- Taller varieties may need staking.
- If you provide cloche protection over winter, the leaves will be more tender.
WHEN AND HOW TO HARVEST YOUR KALE
Your Kale should be ready to start harvesting in late October / early November as full sized leaves and continue through to early March.
Start harvesting the largest leaves, leaving the smaller leaves to grow on. Remove about four leaves from each plant. The leaves should be about the size of an average person’s hand, these will be the tastiest. Smaller leaves can used in salads.
At the same time, remove any leaves which are much larger because they will be bitter and inedible.
When the top area is fully harvested this will encourage side shoots which can then be harvested from February to March when 10cm / 4in to 12cm / 5in long. Don’t over harvest, always leave several leaves to power the plant.
When you dig the plant up in March, all parts of it can be composted.
RAPE KALE
Rape Kale can be grown as Curly Kale but seeds should be sown directly into ground mid July and not in modules / pots / seed beds because it reacts badly when its roots are disturbed. It will produce a crop about a month later than Curly Kale.
BEST VARIETIES OF KALE
Whilst there are a couple of varieties of Rape Kale, plant breeders have concentrated almost exclusively on new varieties of Curly Kale. We have written a page dedicated to the best kale varieties which are easily available in the UK – that page can be be found here.
PESTS AND DISEASES OF KALE
Kale suffers from far fewer problems compared to the rest of the brassica family of vegetables (cabbage, Brussels sprouts, cauliflower etc.) but it does occasionally suffer from similar pests and diseases such as caterpillars and Cabbage Root Fly. We have written a page on the pests and diseases you may encounter when growing kale which can be found here.
KALETTES
Kalettes are somewhere between Kale and Brussels Sprouts. They were bred by Tozer Seeds who wanted to create a new vegetable which had the taste of kale but the convenience in harvesting of Brussels Sprouts. The result is a vegetable which is slight larger than a sprout, has a milder but more nuttier flavour and has open leaves resembling baby kale.
Plants grow to about the same height as Brussels Sprouts, but instead of individual sprouts on the stem you have individual kalettes.
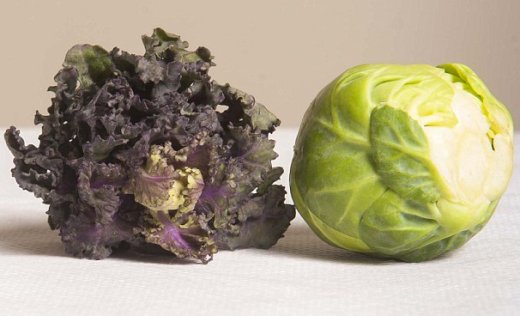
Kalette and Brussels Sprout (courtesy Tozer Seeds)
Kalettes have one disadvantage over Curly Kale and that is their short cropping season which is four to six weeks. However, the majority of the Kalette seed packs on sale are a mix of three varieties, which in effect extends the cropping season up to four months.
They can be grown in the same manner as Kale or Brussels Sprouts. These are tall plants at approximately 70cm / 2ft 4in high and in some areas will require staking. Plant them 45cm / 18in apart with rows 60cm / 2ft apart.
Kalettes were previously marketed under the names Flower Sprouts and Brukale.
END OF ARTICLE
HOW TO GROW
KALE
Adjustable Calendar For Growing Kale
Best Conditions for Growing Kale
When and How to Sow Kale Seeds
Care Plan
When and How To Harvest Kale
Differences in Growing Rape Kale
Recommended Varieties of Kale
Pests and Disease
By David Marks
Kale, including curly kale, has been grown for thousands of years and although plant breeders have produced many new varieties, it remains essentially the same.It is basically a wild cabbage with much more loosely formed leaves. Rich in many vitamins including K, it is a very healthy vegetable.Kale is frost hardy down to -15°C so can be grown in most areas of the UK. Frosts improve the flavour by turning starch to sugar.