TRANSPLANTING BRUSSEL SPROUTS
Before doing any transplanting, prepare the soil where the Brussels Sprouts are to grow for the rest of the year. We have described how to do much of this in the previous page and the key requirement is for a firm soil to support the tall plants.
If your soil is on the clay side then we suggest that no further action is required at this point. However if your soil is on the light side then a small amount of compaction will pay off later. To do this simply walk over the surface of the soil (sounds wrong I know, but good for Brussels Sprouts) to compact it slightly. No jumping up and down mind you, just a gentle walk!
The idea that transplanting your Brussels Sprouts plants improves their health may sound a bit far-fetched to those of you who have not tried it before.
So, for first-timers we suggest that you transplant most of your plants from the seed bed to their final position but leave some, at the correct spacing, in the seed bed for the remainder of the season. Then you will be able to compare the transplant method with the sow in place method. I’m sure you’ll find the transplant method works out best.
Transplant Brussels Sprouts seedlings around the last week of May when they are 13cm / 5in high. This simply involves digging up the young plants and replanting them in their new positions at the correct distance apart.
See here for using cabbage root fly discs prior to transplanting. If you did use them, clean them up and put in place again after transplanting. If you didn’t use them then consider using them now to stop second and third generation eggs of cabbage root fly being laid near the plant.
Plants should be spaced 50cm / 20in apart with rows 70cm / 2ft 4in apart. The transplants should be to a depth so that their lowest set of leaves are touching the ground. If your site suffers from strong winds we recommend that you transplant into a shallowed out area in the soil. See the picture below which shows exactly what we mean.
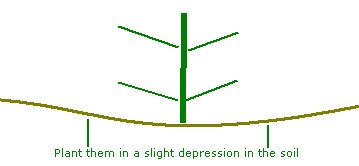
The slight dip in the soil has the advantage that as the plant grows it can be filled in with soil which will provide greater area for the roots to grow into and provide more stability for the plant.
WATERING, FEEDING AND CARE OF BRUSSELS SPROUTS
Watering during dry periods is essential for good sprouts. As always its best to apply lots of water infrequently rather than lots of small amounts which would only encourage root growth near the surface.
Brussels Sprouts are large plants with lots of greenery so they need to be fed regularly. Monthly applications of fish, blood and bone at the rate of a good handful per square metre will feed them well. An additional nitrogen rich feed (Growmore or similar) in mid August will help encourage good sprout formation and strong plants.
A mulch with organic material is excellent for Brussels Sprouts. But before applying it, draw the soil up around the base of the plant (including filling in the dip in the soil) and pat it down well. Now add lots of water round the base of the plants and then apply the mulch.
Material from the compost heap will do the job fine but if you don’t have any, grass cuttings firmed down on the soil will make an excellent mulch. A layer of around 8cm / 3in will kill most weeds and stop any new ones growing, it will also conserve water.
HOW TO HARVEST BRUSSELS SPROUTS
Early varieties of Brussels Sprouts can be ready for harvest in early November and the late varieties will last until early March.
Theres a whole pile of advice about harvesting Brussels Sprouts but in reality harvest them when they look big enough to eat. Don’t leave them on the stem too long because the may well become too leafy.
In general the sprouts lower down the stem are ready first and it is best to harvest theses first which will
encourage the production and ripening of those higher up the stem.
The question is often asked what size the sprouts should be when harvesting. We reckon that a sprout diameter of 4cm / 1½in is the optimum size for tasty, firm sprouts and getting a reasonable harvest. Much larger than that size and you run the danger of the sprouts “blowing” (becoming loose and bitter).
As you harvest the sprouts, cut off any yellowing leaves near the base of the plant. Leaving dead leaves on only encourages pests and diseases. The green leaves at the top of the plant can be cut off when about two thirds of the sprouts have been harvested and used as spring greens.
Many people love the taste of fresh greens from the tops of of Brussels sprouts. When you do harvest the tops though be aware that this will hasten the ripening of the sprouts below.
When harvesting is complete the main stem should be dug up (not pulled out), chopped up and can then go on the compost heap. We cut off and burn the roots to reduce the risk of introducing club root into the compost heap. Don’t just pull up the the main stem because this can leave portions of it underground again increasing the risk of club root. Dig them up don’t pull them up is the rule.
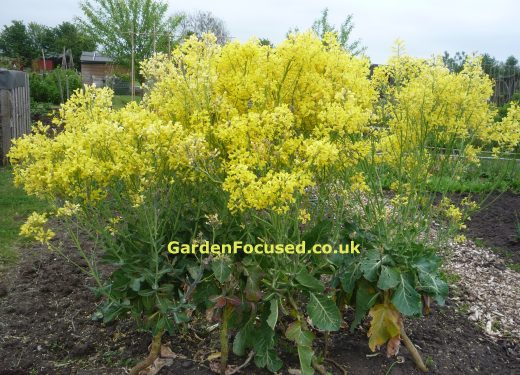
Brussels Sprouts in flower during late May
An alternative to digging all the plants up is to leave some of the in the ground as a small clump. As the picture above shows, they will flower in May and produce spectacular yellow flowers.
NEXT PAGE – PESTS AND DISEASES OF BRUSSELS SPROUTS
When and How to Sow Brussels Sprouts
Ongoing Care of Brussels Sprouts
Pests and Diseases
Recommended Brussels Sprouts Varieties
Brussels Sprouts Recipes
HOW TO CARE FOR BRUSSELS SPROUTS
Our previous page on Brussels Sprouts showed you how to sow Brussels Sprouts in the soil and the position where they will grow best. It also showed our unique Brussels Sprouts care calendar. This page shows you how and when to transplant your seedlings and why they appreciate being transplanted. Ongoing care and harvesting are also discussed in detail.