GROWING TOMATOES IN GROWING BAGS AND CONTAINERS
There are a few differences between growing tomatoes in open ground and growing them in growing bags / containers, these are described below.
This article assumes you will be growing you tomatoes outside (stating them off inside) in either grow bags or containers, both are grown in the same way.
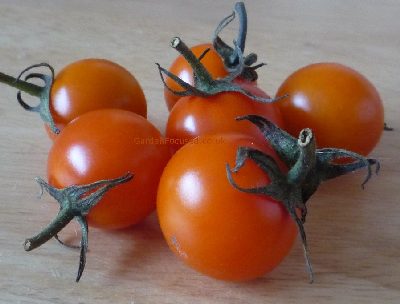
Sungold tomatoes
There are two main types of tomato plants as far as growth habit is concerned, and these are described below.
TYPES AND VARIETIES OF TOMATOES FOR GROWING BAGS AND CONTAINERS
CORDON / INDETERMINATE TYPES
These are sometimes also called upright tomatoes. This type of tomato plant tends to grow upright and because of this they require support by canes or suspended string. They also need pruning to encourage them to put most of their effort into growing top quality fruit rather than lots of foliage. As far a grow bags and containers are concerned the main advantage of cordon type tomatoes is that they occupy less space compared to the other type of tomato.
BUSH / DETERMINATE TYPES
Bush type tomato plants need no pruning and form a bush type shape, they also do not normally require any support. Those are the plus points in their favour, the minus points are that the tomatoes take longer to mature and the plants take up more room.
Dwarf bush tomato plants are much the same but they are far more compact and tend to produce cherry tomatoes earlier than the normal varieties.
TOMATO SHAPES AND SIZES
The above describes the types of tomato plants however their are several different types of tomato shapes and sizes. The common ones are cherry tomatoes (small tomatoes, generally slightly smaller than a golf ball), standard tomatoes (medium sized and round), plum tomatoes (oval shaped and good for cooking and eating as well), beefsteak tomatoes (large and round) and finally marmande tomatoes (large and unevenly shaped).
So which are the best varieties for grow bags and containers? That’s clearly a personal opinion however we rule out beefsteak and marmande because they take too long to mature outside of a greenhouse. In general we go for the smaller plants with the cherry tomatoes with one exception. So our top varieties for growing bags and containers are:
SUNGOLD
Cherry tomatoes, very reliable and good disease resistance, they are of the cordon type. They produce the sweetest orange tomatoes ever, delicious.
GARDENERS DELIGHT
The most reliable of all the cherry tomatoes, good disease resistance, tasty red smallish fruit. If you are a beginner, go for this cordon variety.
ALICANTE
A cordon type of standard medium sized tomatoes. This is how a typical tomato should look. Red, round even shaped fruit and pleasant tasting. Easy to cut and serve sliced in salads. This variety has been tried and tested beyond belief and always produces a good crop. Any green fruit at the end the end of the year (small and large) ripens supremely well on a window sill.
TIGERALLA
Good for an experiment. The tomatoes are medium sized, striped orange and red and look great in a salad.
GROW FROM SEED OR BUY SMALL PLANTS?
Nowadays garden centres and diy stores sell vast amounts of of small and not so small tomato plants for growing on at home. These offer a real alternative to growing tomatoes from seed and when the cost of seed, compost, pots and even heating are taken into account they are not as expensive as they seem at first.
The good points for shop bought plants are that all the sowing and initial growing work is done for you. You can see and choose individual plants to buy. The downside is that you are severely restricted as to which varieties are available. And lets face it, the satisfaction of growing your own from seed is often too hard to resist.
HOW TO SOW TOMATO SEED
Sowing the seed is easy, the real key to growing tomato plants from seed is getting the timing correct. The reason timing is crucial is that if you sow the seed too early you will end up with large plants indoors which take up a surprising amount of room. The larger the plant, the less suitable your windowsill becomes. But sow the seed too late and you will miss out on valuable growing time and tomatoes need the maximum growing time in the UK.
To judge when to sow the seed you need to know how long after sowing the seed the plant will be ready to transplant outside, this time is roughly seven weeks. Now you need to calculate when you can plant outside and for this you need to know the last frost date in your area. This is crucial because the last frost date differs significantly depending on where you like in the UK.
We give three different schedules for sowing tomato seed below first based on the south of England, for example Basingstoke (last frost date fourth week of April), then the Midlands, for example Coventry (last frost date second week of May) and finally a cool area, for example Leeds (last frost date fourth week of May). The example includes a date for “harden off” which is discussed lower down this page.
| SOW SEED | HARDEN OFF | PLANT OUT | |
|---|---|---|---|
| Basingstoke | March week 2 | April week 4 | May week 1 |
| Coventry | March week 4 | May week 2 | May week 3 |
| Leeds | April week 2 | May week 4 | June week 1 |
For sowing tomato seed you will need some 7cm / 3in pots, multi-purpose compost, tomato seeds and plant markers.
Fill each pot with moist multi-purpose compost leaving about 2cm free at the top. Place one seed (two if you have lots) on the soil surface and scatter some more compost over the top so that the seed is just covered. If the compost is not moist, water the pot by placing the base in water for a few minutes. Label up each pot.
You now need to get conditions correct for the seeds to germinate. The ideal temperature is about 24C / 75F, so store the pots in a dark place at around that temperature. The seeds will take around seven days to germinate (sprout tiny leaves above the soil surface) and at that stage take the pots out of the dark and place them on a light window sill but not in direct sunlight.
You will need to turn the pots round every couple of days because the seedlings will be drawn towards the light. Try to avoid chilling the seedlings at night on the windowsill. This can easily happen if you close the curtains on a cold night with seedlings still on the windowsill. They get very cold in that situation and this can stunt their growth. Either bring them inside the room on cold nights or leave the curtains open.
For the next few weeks keep the compost moist but not waterlogged. There is no need to feed your tomato plants at this stage, the multi-purpose compost will have more than sufficient nutrients in it to keep your plants growing.
POTTING UP TOMATO PLANTS
Potting up plants involves transferring them to a larger pot to allow them to grow well, nothing more complicated than that. After about 4 weeks your tomato plants will begin to outgrow their pots and it’s a good idea to transfer them to 12cm / 5in pots.
Sprinkle a thin layer of compost over the base of the new pot. Tip up the potted tomato plant into the palm of your hand with the stem in between two of your fingers. Tap the pot until the plant falls into your palm and then transfer the tomato plant into the larger pot. Fill around the edges with more compost and a little over the surface. It’s a good idea if the plant ends up slightly deeper in the compost compared to before.
Continue growing on the tomato plant exactly the same as described above. There is no need to feed the plant at this stage.
HARDEN OFF TOMATO PLANTS
Hardening off plants is the process of gradually exposing them to natural outside conditions. If this is achieved gradually over a week or two the plants will suffer minimal shock when they are finally transplanted into their containers or grow bags.
See the timetable a couple of paragraphs above for the best time to harden off tomato plants in your area of the UK. The idea is to place the plants outside for a couple of hours on day one in a sheltered position and then take them back inside. Over the next week or two increase the time they stay outside. Always take them back inside however if a frost is possible.
HOW TO PLANT TOMATO PLANTS IN GROWING BAGS
If you plan to use growing bags for you tomatoes then check out our article which reviews them for performance and price. The article can be found here.
It’s quite possible simply transplant your tomato plants to the growing bag and let it grow on. However for the very best results we suggest using some ring culture pots, they really produce much healthier tomato plants. Ring culture pots are simply large pots with no base in them, the expensive ones are plastic but cheaper fabric ones are just as good for a season’s use.
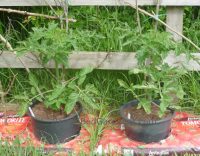
Tomatoes growing in ring culture pots
Cut two x shaped slits in your growing bag, you can do three but for tomatoes, two are definitely best. Now place the ring culture pot firmly into the top of the compost of the growing bag. Remove a few of the lower leaves and side shoots from your tomato plant and place it into the ring culture pot. Now fill around the sides of the tomato plant with more compost, nearly to the top. Your tomato plant will be planted a few inches deeper in the soil which is ideal for tomato plants. They will grow roots from the stem to firmly anchor the plants down.
Note that instead of buying ring culture pots it’s also just as good to use a large pot with the bottom cut off.
HOW TO PLANT TOMATO PLANTS IN CONTAINERS
The size of the container is key to successfully growing tomatoes, we suggest 45cm / 15in wide is the smallest, the larger the better.
Fill the container nearly to the top with multi-purpose compost. dig out a hole about the size of the tomato plant pot but about 8cm / 3in deeper, remove the tomato plant from it’s pot and place in the hole. Fill around and on top with compost and water in well.
CARING FOR TOMATO PLANTS IN CONTAINERS AND GROWING BAGS
The first and foremost need of tomatoes in containers and growing bags is a constant supply of water that keeps the compost moist. Erratic watering can lead to the fruit splitting and lack of water can kill them. Little and often is the rule as best as you can.
As soon as the flowers begin to fade and start to form tiny fruits (this is called setting) begin feeding your new tomato plants with a liquid tomato fertiliser such as Tomorite. Read the instructions on the bottle to work out how much to feed them. A once a week feed should be sufficient.
In early September stop the tomato feed and feed once a week with a general purpose liquid feed.
For all types of tomato plants it’s best to pinch off any stems and leaves which are touching the soil. It’s very easy for these leaves to be attacked by fungi and pinching them off will do little harm.
PRUNING TOMATO PLANTS
Bush type tomato plants are easy to grow and require little or no pruning. We would remove lower stems and leaves which are touching the soil (see above). Around September we would also remove the smaller green fruit in order to encourage the larger fruit to mature quicker.
Cordon tomato plants do need a little more pruning but it’s relatively easy to do. Whenever you water your tomato plants just take a look at the stems and you will see main stems coming off from the central stem.
Often, where a main stem joins the central stem you will see a side shoot forming. As soon as the side shoot is large enough use your fingers to gently snap it off. Click the picture below to enlarge it and see more clearly.
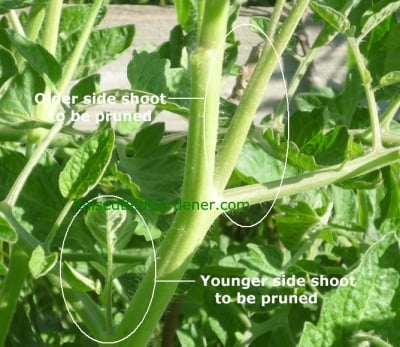
Click the picture to see it enlarged
Cordon and Bush Types – around early July time the tomato trusses (small bunches flower buds which will eventually form into tomatoes, see the picture below for an example) will have begun to form and start to swell. Count the trusses and when eight or nine have formed on plants which produce smaller tomatoes (e.g. Sungold and Gardener’s Delight) pinch out the top of the main stem just below its top growing point. This will effectively “stop” the plant growing taller. Do the same for tomato plants which produce larger tomatoes but do it when there are six or seven trusses formed.
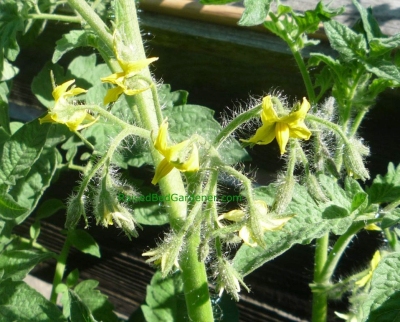
A tomato truss
If more trusses form after this initial pruning you may want to cut them off. It’s a balancing act when pruning tomato trusses – the fewer the number of trusses the quicker the fruit will form. But at the same time removing trusses will reduce the potential crop of tomatoes. Our advice would be to limit the number of trusses to around 12 per tomato plant – a few more if the weather has been good, a few less if the weather has not been so good.
When a tomato truss forms, it will typically have 15 to 20 young flower buds beginning to form. This is too many for the stem to support and if all are allowed to grow the tomatoes may become crowded and liable to pests and diseases. If you click the picture on the left to enlarge it you will see that this particular truss has about 20 flowers / buds. A good number per truss would be four to six.
Remove the less developed shoots carefully by pinching them off with your finger tips. This will help the remaining flowers to develop more quickly (and more healthily) into fully grown tomatoes.
HARVESTING TOMATOES
The only sure way to know if a tomato is ripe or not is to taste it. That way you will have a good idea when to pick other tomatoes. If you gently squeeze a ripe tomato it will have a little bit of give in it, just slightly soft – colour is another good indicator if tomatoes are ripe or not. To harvest either cut the tomato stalks or twist them off.
Fresh tomatoes always taste best but if you get to the end of the season and you still have lots of green tomatoes, pick them off the plant and store in a warm (around 22C / 72F) place and let them ripen off the plant. Don’t pile your tomatoes up, store them in a single layer. They ripen well in the average kitchen and you can easily keep an eye on them, discarding any which don’t ripen well.
TOMATO PESTS AND DISEASES
Tomato plants grown in containers and growing bags tend to suffer less from pests and diseases mainly because they are planted in clean compost every year. The first preventative measure with tomatoes is cleanliness. Dispose of fallen fruit and leaves regularly.
Regular and sufficient watering is another important factor for healthy tomatoes. Not only do tomatoes grow well well with a good water supply but they also need a regular supply. If the water supply is erratic then tomatoes can split making them inedible and also allowing diseases to get into the plant.
APHIDS AND WHITEFLY
These are tiny insects (green aphids and white whiteflies) which initially cluster on the undersides of leaves, they especially like tender new shoots. When the numbers are small simply squash them with your fingers. If the are gathering on particular leaves then cut the affected leaves off and dispose of them. If the attack becomes serious then spray with water with a small amount of washing up liquid in it – a teaspoon or two in a couple of litres of water should do the job.
TOMATO BLIGHT
This is the same as potato blight. With tomatoes, the first sign will be brown spots on the leaves followed by brown marks on the stems and fruit. This is a wind and rain born disease which occurs in warm and damp conditions. There is no effective cure available for the gardener. The key is prevention. Don’t plant tomatoes too close together, this will allow good air circulation. Two tomato plants per growing bag is definitely better than three.
Cleanliness is hugely important, dispose of fallen foliage and fruit immediately you see it. Burn all infected plants to lessen the chances of disease next year.
TOMATOES AND COOKING
Tomatoes form the basis for a wide range of recipes and the best tomatoes for cooking are very ripe, fresh ones. If you read up top rated Italian recipes for ragu you will notice that they never use canned tomatoes, they always use concentrated tomato puree or fresh tomatoes. The reason is that canned tomatoes have a metallic or slightly vinegary taste to them. It’s not clear why, possibly the can itself or the sterilising process cause this.
Freezing you home-grown tomatoes is the best way to store an excess for use in later cooking. Break them up in a food processor and store them in freezer bags or containers. Some people remove the skins, some remove the bit where the stalk was joined, we haven’t got time for all that and honestly we can’t tell the difference. Tomatoes frozen like this will last three months easily in the average home freezer.
The classic use for tomatoes is of course tomato soup – try this one
here for lots of tomato taste and texture (see picture below).

Tomato and apple chutney is one of our favourite ways to use up tomatoes, see here. Our final suggestion is tomato and feta cheese tarts which can be found here. These look and taste spectacular but are very easy to make.
READER COMMENTS AND QUESTIONS ABOUT THIS PAGE