HOW TO GROW MARJORAM IN THE UK
Article by David Marks
Marjoram (Origanum majorana) has been cultivated for thousands of years and it originates from the Mediterranean areas of Southern Europe as well as parts of Asia. It’s a sun loving herb and although it can withstand a touch of frost, a prolonged period of cold weather is often enough to kill it. Marjoram is grown almost exclusively for its use a herb rather than as an ornamental plant.
Marjoram is sometimes confused with oregano because they both come from the same family, however they do have their individual taste and many cooks, possibly the majority, prefer the mellow and sweet flavour of marjoram in comparison to the stronger and spicier flavour of oregano. Marjoram is often called ‘Sweet Marjoram’. Click here For more in depth information on the differences between marjoram and oregano.
QUICK CALENDAR FOR GROWING MARJORAM
Sow seed in pots indoors – the first week of March
Time for root division - the third week of March
Thin out seedlings - the last week of March
Harden off young plants - the third week of April
Plant / grow in pots outside - the first week of May
Begin to harvest - the first week of May
The calendar dates above can be adjusted to conditions in your area of the UK (permanently for the entire site) by clicking here. Marjoram is not frost hardy so the dates given for hardening off the plants and planting them out are relatively fixed. However, there is nothing to stop you sowing seeds up to a month earlier which will give you stronger and larger plants at planting out time. Those plants can then be harvested a couple of weeks earlier than shown in the above calendar.
GROWING MARJORAM FROM SEED IN THE UK
Because marjoram is frost tender you may well need to grow new plants each year and a good way to do this is from seed. The seeds you want will be labelled "Sweet Marjoram" probably also with the Latin name Origanum majorana. A few seed companies, notably Thompson and Morgan, give an incorrect spelling of the Latin name as Origanum marjorana although they are the same plant. Sweet marjoram, unlike some varieties of oregano, almost always grows true to type when grow from seeds supplied by good quality seed merchants.
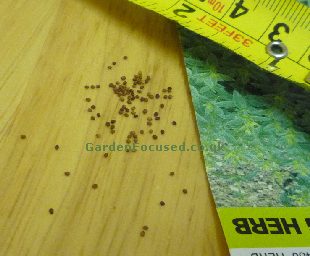
Sweet Marjoram seeds (Origanum majorana)
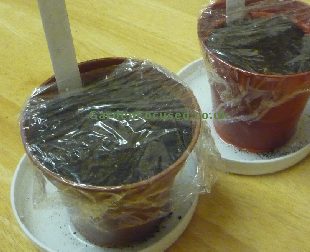
To prepare, fill one or more 8cm / 3in wide pots with multi-purpose potting compost. Place them in a shallow container of water until the compost is moist. Marjoram seeds are very fine and difficult to handle individually so sprinkle five to ten over the surface of the compost and then cover very thinly with more multi-purpose compost. Cover two thirds of the pot top with cling film (do not cover with something that will exclude light). Place the pots in a light and airy position at a temperature of about 70°F / 21°C - a few degrees either way will be fine. The seeds will take about eight days to germinate.
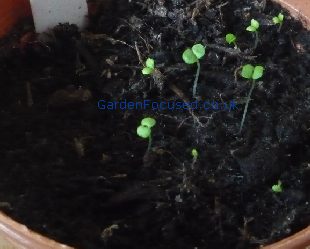
As soon as you see the seedlings appearing above the surface remove the covering on the pots. After a week or so cut the tops off all but the strongest seedling in each pot. Grow the seedlings on in the same conditions, turning the pots daily if growing on a windowsill. No feeding is required, there are sufficient nutrients in the multi-purpose compost to last for four to six weeks.
PROPAGATING MARJORAM FROM ROOT DIVISION AND CUTTINGS
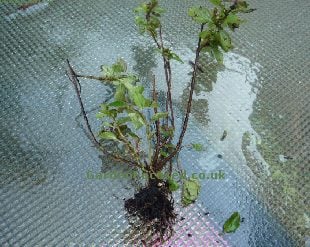
Marjoram is a spreading plant and the roots grow just under the surface springing up new plants over a largish area. Cuttings can be taken but a far more reliable propagation method is by root division. Take a look at your plant and select a healthy looking bunch of stems which are clearly rooted in the soil surface. The best root divisions will contain stems which are not too woody. The best time for root division of marjoram is the third week of February 2015 (UK average). See the picture below for a good choice for root division. Click any picture to enlarge it.
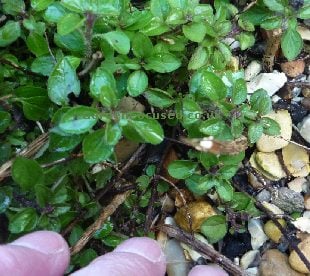
A good choice for root division
When taking the root division it's important not to damage the stem above ground which are relatively delicate. The roots below the surface are far tougher and unlikely to be damaged by division. When you have selected an area dig gently into the soil around it with something like a plant marker. Then use your fingers to tease out some of the roots below. Snip off the rots with your finger tips, gently tug and you should have something that looks like the picture below.
Root division Sweet Marjoram
The root division will take much better if woody stems are cut back and you are left with new, young growth. Cut off any woody stems and you will be left with a ready-to-plant root division (see below).
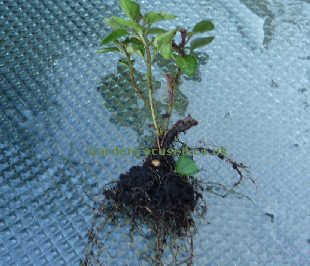
Trimmed and ready to plant
Fill a small pot (8cm / 3in or so) with ordinary multipurpose compost. Make a hole in it with a plant marker and place the root division in it to the same level as it was previously. Water well, mark it up with the variety name and place it in a cool but frost position (a cool windowsill is good) out of direct sunlight.
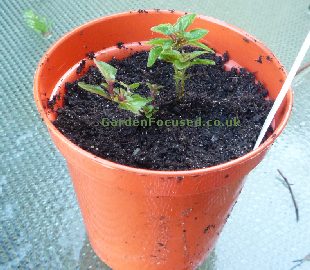
Potted Sweet Marjoram root division
After about two weeks the marjoram will have rooted in the compost and it can be hardened off and planted out as explained below.
PLANTING AND CARE OF MARJORAM
Marjoram is a frost tender herb so whatever time you may have grown it initially it should first be hardened off before planting outside and that applies to plants bought in garden centres and online. Start to harden off the plants in the third week of April 2015 (UK average). To do this place the plants outside for a few hours initially and over the next two weeks increase the amount of time spent outside gradually.
It is possible to plant marjoram in open ground however the vast majority of gardeners plant in containers of some sort. The size of the container may well be different if you want to over-winter the plant inside or leave it outside. The minimum pot size we would recommend for a decent crop is 20cm / 8in wide, the larger the pot the bigger the crop of leaves.
Make sure the pot has good drainage holes in the base. Fill with 2cm / 1in of stones to help drainage and then fill over with multipurpose compost. Make a hole in the compost large enough to take the potted plant, infill with compost, firm down and then water in well. Marjoram in the UK will do best in a full sun position but you will still get decent crop with four hours of sunshine a day.
Plants in pots are always prone to drying out quickly but marjoram is relatively drought resistant though not as good as oregano. Water only when the top 3cm / 1in of compost is dry. The easiest way to feed marjoram is to sprinkle half a handful of blood, fish and bone over the surface every month. Gently work it into the soil surface to prevent it blowing away.
Marjoram is frost tender but will stand a few degrees of frost for a couple of days. In warmer parts of the UK it can be left outside over winter, against a warm house wall or an unheated greenhouse are fine. But in cooler parts of the UK, winter will kill it most years if left unprotected outside. The plants can be taken inside and overwintered on a light windowsill if they are kept on the dry side. We have never tried this because they are easy to grow each year as an annual from seed.
WHEN AND HOW TO HARVEST MARJORAM
This will depend on when the plant was first started off however following our calendar above your marjoram herbs will be ready to harvest in the first week of May 2015. To harvest simply snip off the top stems, marjoram tastes almost the same before, during and after flowering so this is one herb where the timing is not important. You may want wash the harvested herbs first, we have never been that fussy unless we can clearly see it is not clean.
If you are using the herb fresh simply strip the leaves from the stems and add to the meal to be cooked. As a rule of thumb, where a recipe calls for dried marjoram use twice quantity of fresh marjoram. Died marjoram retains a good portion of the flavour and aroma of the fresh type and the drying process is similar to many herbs. Cut off some sprigs, tie them together and hang in a dry and airy place. the herbs will be dried after a week or so and can be stored in a jar or old spice container. When it’s time to use the herbs strip the leaves from the stems and use as normal.
END OF ARTICLE